Karen R Savage

Professional Voice Talent, Amateur Actor and Knitter

Knitting Cast-ons

I’m demoing a variety of knitted cast ons at this week’s Knitting Circle. This is a collection of resources to refer back to.

Regular Cast Ons

Knitted Cast On
As its name implies, this cast on is based on the basic Knit stitch. Start with a slip knot on your left needle. Insert your right needle into the slip knot and work a knit stitch, but instead of slipping the worked stitch onto your right needle, place it back on your left needle. You now have two stitches, and your needle is set to work another.
Demo with video and pictures

Cable Cast On
This is similar to the knitted cast on. Begin the same way, until you have two stitches on your left needle, but then insert your needle between the first and second stitches and work as if it were a knit stitch, slipping the new stitches onto the left needle as with the knitted cast on.
Demo with pictures

Long-tail Cast On
Start with a slip knot on one of your needles, which you hold in your right hand. Loop the yarn over your thumb and forefinger, with the tail end over your thumb, and anchoring both ends of the yarn in your fist. Bring the needle tip up into the center under the strand of yarn that runs from your thumb to your fist, over the strand on your index finger, and through the loop this has created over your thumb. Release the loop of yarn and tighten your new stitch.
Demo with pictures

Backwards Loop Cast On
Start with a slip knot on one of your needles. Pick up a loop of yarn and twist it, then place it on your needle, making sure the tail is trapped between the outside of the loop and the slip knot.
When knitting your first row of stitches after casting on with this method, you will feel that you have done something wrong, because the cast on loops will suddenly feel very loose. This is normal with this technique. Don’t panic!
Demo with video and pictures

Jeny’s Stretchy Slip Knot Cast On
This is the stretchiest cast on I know of. It is just a series of slip knots. Caveats for this method:

  • Works best with a smooth yarn. Fuzzy or bumpy yarns will not want to tighten properly.
  • You must be careful to hold the beginning of each slip knot right up against the previous one, because it is a knot, and once it has been tightened, you will not be able to snug it up.
  • Hold the bottom of each slip knot as you tighten, otherwise you will end up with a twisted line of stitches.

Creator’s website with link to demo video

Provisional Cast Ons

A provisional cast on creates a line of live stitches that can be worked in either direction. You will usually work in one direction, then return to your cast on, pick up the stitches being held on your spare yarn, and continue in the opposite direction.

Long-tail-style Provisional Cast On
Take a strand of yarn of a similar weight to your working yarn (it is best to use a smooth yarn of contrasting colour) and tie the two yarns together. Anchor the knot against the needle in your right hand, and loop the two yarns over the thumb and forefinger of your left hand, with the working yarn over your thumb and anchoring the ends in your fist. Rest your needle between the two threads, and from that position, bring it down and under the working strand, then up and over the provisional strand and under the working strand again, down through the center and up along the index finger side. This will create two stitches. If you have a nice, flexible cable needle, you can use that instead of the waste yarn. The advantage is that it’s easier to pick up the stitches from the cable needle than from the waste yarn. Even better, if your cable needle is of the same size as your working needle (or you have a set of interchangeable needles), you’ll just be able to start working from that needle without having to pick up stitches at all!
Demo with video

Crochet Provisional Cast On
Using a scrap of spare yarn (preferably a smooth yarn in a contrasting colour to your working yarn) crochet a chain that is ten or fifteen stitches longer than you need to cast on. Turn the chain over so that the bumps on the rear of the stitches are visible. Starting a few stitches from the end, pick up and knit the number of stitches you need into consecutive crochet bumps.
Video demo

This is just a bare sampling of the different types of cast ons available. A quick google search will reveal that there are literally dozens of different cast ons and variations on cast ons. We will always have a favourite go-to cast on, but it’s good to be passingly familiar with other methods, which might work better for a given project.

Some other online resources
Keep On Knitting Blog
Cast Ons Page on KnittingHelp.com
Knitting At Large’s Catalog of Cast Ons

Contest Winners

Well, four people responded to the post, so you’re all winners! Expect a message shortly at the email address you entered when you commented with the coupon code and instructions for redeeming it.

Free copies of Zeiihbu Master

I have five free copies of my latest audiobook, The Zeiihbu Master by Kristen Taber to give away! If you’d like a chance to win one, comment on this post and I’ll randomly pick five. Contest ends at midnight on Wednesday 11/26. Winners to be announced the next day.

The Zeiihbu Master

The Zeiihbu Master (Aerenden Book 3) by Kristen Taber has now been released.

Separated and on opposite sides of the kingdom, Nick and Meaghan face different pursuits which could change the balance of power in Aerenden forever.
While Nick trains the villagers to be soldiers, Meaghan and a small rescue party venture into Zeiihbu to find Faillen’s young son, before Garon can use the boy’s power to destroy those still fighting against his rule.
Everyone knows Meaghan could be on a suicide mission, but when Nick stumbles upon a secret concealed in one of the southern villages, he realizes that Garon might not be Meaghan’s greatest foe. The enemy most likely to kill her is someone who has also promised to keep her safe.
©2014 Kristen Taber (P)2014 Kristen Taber

Knitting Two At A Time

A friend of mine has asked me to make her a pair of mittens in her school colours, to match the beanie I made her a month or so ago. Earlier this year I finally finished my first pair of socks, which I had started in 2011. I didn’t find making socks difficult, but after I finished the first one, I got bored and it was literally years before I picked up the project again to finish it. I have the same problem any time I have to make two of something, socks, sleeves, mittens, etc. So I vowed to myself that I would learn how to knit two at a time, and this is the first project I’ve taken on since then that involved a pair of items.

After a bit of searching, I found this great tutorial.

This technique uses a single circular needle – there are also instructions out there for knitting two at a time using two circulars, but since I’m already comfortable with magic loop knitting, I specifically searched for instructions that used a single needle.

There’s one addition I’d make to the tutorial, based on the way I join to knit in the round. It took me years to feel comfortable knitting in the round because I could never get the join tight, and always ended up with a ladder between the first and last stitches. I finally found a suggestion somewhere on the web to cast on an extra stitch, and knit it together with the first stitch. After that, there was no stopping me.

So, to use this joining method with the knitting two at a time technique:
After casting on for the second item in the pair, slip the extra stitch to a locking or split-ring stitch marker, then continue to the second half of the first item in the pair. That way, when you get back to the second item, you’ll be able to slip the extra stitch to your needle and knit it together with the first stitch.

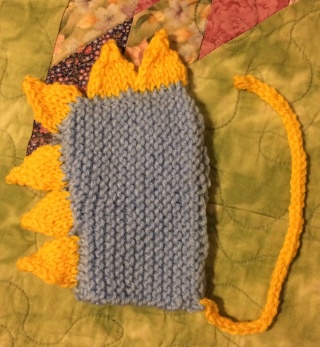
Rawr. I’m a monster (bonnet)

I found this totally adorable bonnet pattern (here) that I wanted to make for the Knitting Circle’s charity drive. Only problem was it required seaming – the bonnet’s sewn flat and then sewn together at the back, and the little spikes are knit separately and then sewn on. I hate seaming. It’s my least favourite part of knitting. So, I re-engineered the pattern.

The difference starts on row 26, the first bind off row.
26. Knit to last 8 stitches, turn the work
27. Knit to last 8 stitches, turn the work
28. Knit to last 12 stitches, turn the work
29. Knit to last 12 stitches, turn the work
30. Knit to last 16 stitches, turn the work
31. Knit to last 16 stitches, turn the work
32. Knit 8

Fold the work in half and bind off using Gartered Kitchener Stitch (garter version explained at the bottom of the page), or 3-needle Bind Off.

For the spikes:
Pick up and purl 12 stitches in two parallel rows along the center line of the bonnet.
Join to work in the round.
Continue with original instructions.

I worked the spikes on three double-pointed needles, two to hold the two lines of stitches, and a third as my active needle.
I also realized when I was nearly done with the first spike that I’d done it in stockinette, instead of reverse stockinette, but I was happy with how it looked and decided to keep it that way.
Finally, instead of braided ties, I used i-cord (there’s only one done in the picture).

Reuse

A couple of years ago I started knitting on circular needles almost exclusively. I had bought a set of KnitPicks interchangeable circulars and they changed my knitting life. The cord they use is lovely and flexible. It made using the magic loop method for small diameter circular knitting a delight. Add to that the fact that I have, more than once, accidentally stabbed myself in the mouth when knitting with double-pointed needles (In case you’re wondering, it’s during the switchover. I hold on to the spare with my teeth, and then as I go to grab it, I’ll sometimes end up jabbing it into my tongue or lip – I’m really smooth like that), and magic loop just seems safer. Later I also started using circulars for flat knitting. It’s especially useful on trips. If you drop a needle, you don’t have to go diving after it, it’s right there, attached. One of these days I’ll sort through my knitting supplies and give away all the needles I don’t use anymore. But I’m keeping one. I’ve discovered a new use for the long aluminum needles – they make great back scratchers!

Greed and other deadly sins

This is Lucy’s new sister, Georgie.

She joined the family back in October (she’s nearly half again as big as in that photo now).

One of the funniest things I’ve noticed about her is how she always wants what Lucy has. If Lucy’s on my bed, she wants to be on my bed; if Lucy’s getting a cuddle, she wants a cuddle; and if Lucy’s chewing on an antler, she wants that antler… even if she was chewing on one of her own for ten minutes before she realized that Lucy had one too.

Triple Shot

Triple Shot (Maggy Thorsen Book 7) by Sandra Balzo has just been released.

There’s a chill in the Wisconsin air, and it’s a shot in the arm – a triple espresso shot – to Uncommon Grounds, the Brookhills coffeehouse owned by Maggy Thorsen and real estate maven Sarah Kingston. Their new autumn drink is a huge success. But two estate agents have died lately, and Sarah herself is under investigation for irregularities at her job. Then a stench begins to percolate through the coffeehouse, and soon it’s clear that corpses – like other bad things – do indeed come in threes…

©2011 Sandra Balzo (P)2014 Sandra Balzo

The Gildonae Alliance

My latest audiobook is The Gildonae Alliance, the second Aerenden book, by Kristen Taber.

Several months after Meaghan’s return to Ærenden, the kingdom’s war has taken a turn for the worse. The Mardroch army hunts the new King and Queen, destroying villages in its wake. And Meaghan and Nick, training for battle in their remote section of wilderness, are far from safe. Danger hides in shadows and behind innocent faces. Allies become foes. Each day is a fight to survive. But in the end, only one threat matters. And it’s a threat they never see coming.

©2013 Kristen Taber (P)2014 Kristen Taber

Page 3 of 22

Powered by WordPress & Theme by Anders Norén